So, you brush twice a day, avoid sugary drinks and snacks, and see your dentist regularly. Do you still have to floss?
The short answer: Yes. At least once a day. Flossing is an extremely effective weapon against plaque accumulation, especially between teeth, where it can hide well and is often missed by brushing. Plaque is the principal cause of tooth decay. It can also cause periodontitis (gum disease), bad breath and other problems. Brushing is VERY important, yes, but flossing removes plaque that is hard to reach with your toothbrush.
Many people think flossing is too time-consuming to be worth it. But, once you learn how to do it properly, it takes less than the 2 minutes! (The same amount of time we (are supposed to!) spend brushing!
If you’re only going to floss once a day, at night before bed is the best time, because there is less saliva in your mouth at night while you sleep and therefore, the plaque is more concentrated and potentially more damaging.
HOW TO FLOSS CORRECTLY
Because you’ll be putting your hands IN your mouth, start with clean hands. Use a piece of floss about 18 ” long. (That may sound like a lot, but you want enough floss to be able to keep a clean section of it available as you move from tooth to tooth. You’ll be wrapping the “dirty” floss onto one hand and releasing the “clean” floss from the other, so you’ll need a long enough piece to do that.)
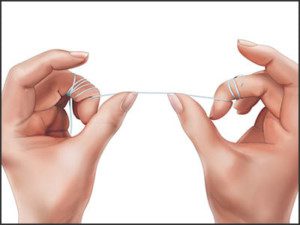 Wind it around the middle finger of both hands, and leave a gap of around 1-2″ in between to work with. (Using the middle finger to wrap the floss around leaves your index fingers and thumbs free to easily manipulate the floss. You can use different combinations of your thumbs and index fingers to correctly position the floss between your teeth for all areas of your mouth. Most people find it comfortable to use their thumbs to manipulate the floss between the upper teeth and index fingers for the lower teeth). *TIP: *A VERY common mistake people make is in tightening their lips and cheeks, making it difficult or even impossible to get their fingers into their mouth with room to manipulate the floss. So, remember to relax!
 Next, gently guide the floss into the space between your teeth, using a zig-zag motion.*TIP: *If the gap is tight, be careful not to let the floss snap or “pop” between the teeth. (Snapping it between the teeth can damage the little pink triangle section of the gums between them over time and cause recession). Contour the floss around the tooth, making a “C” shape. A gentle, side-to-side sawing motion is good to use here, to help slip the floss gently between the teeth.
![]() With the floss wrapped around one tooth at a time, run the floss up and down the surface of the tooth, making sure you are going down to the gum line and then up to the highest contact point between the teeth, all the while, forming the letter “C” with the floss. *TIP: *You want your fingers as close to the front and back of the tooth as possible, so both fingers move up and down simultaneously until you hear a squeaky clean sound. (This is easier with unwaxed floss.) The closer together your fingers are, the more control you have flossing. Do this motion on around both of the teeth you’ve got the floss positioned between.
With the floss wrapped around one tooth at a time, run the floss up and down the surface of the tooth, making sure you are going down to the gum line and then up to the highest contact point between the teeth, all the while, forming the letter “C” with the floss. *TIP: *You want your fingers as close to the front and back of the tooth as possible, so both fingers move up and down simultaneously until you hear a squeaky clean sound. (This is easier with unwaxed floss.) The closer together your fingers are, the more control you have flossing. Do this motion on around both of the teeth you’ve got the floss positioned between.
After both sides are done, just slide the floss out from between the teeth. If it’s frayed or brownish, that’s good! You’re removing plaque (and possibly food particles and whatnot!) Unwind a little new floss from the “dispenser” finger (of one hand), and take up the used floss on the other finger (of the other hand).
Repeat the process on the spaces between all of your teeth. Work all around the entire mouth — and don’t forget back sides of the last molars. Once you’ve gotten the hang of it, it doesn’t take much time at all!
Using a Flossing Pick
 If you use a hand-held flossing pick, the technique is similar. Hold the flosser handle firmly. Point the flossing tip at an angle facing the area you want to floss first. Guide the floss gently between two teeth, and be sure to avoid snapping or popping the floss. Use the same zig-zag motion that you would use with standard floss to get it in place. Bend the floss around each tooth and slide it under the gum line and along each tooth surface in that same “C” shaped fashion. Up and down, and then gently out.
Flossing Around Dental Work or Braces
 If you wear braces or other dental appliances, like fixed bridges, proper flossing technique can be trickier than without them. It is especially important to avoid getting floss caught on wires or brackets and allow you to thoroughly cleanse under and around everything. You can use a floss threader that can be easily threaded under the main wire (also called the arch wire) on your braces, or underneath your fixed bridge. To use a floss threader, place an 18-inch piece of the floss of your choice through the loop. Then insert the pointed end of the flosser under the main wire and pull through so the floss is under the main wire (like sewing). Once you have the floss in place, follow the same principles of proper flossing technique that you would use with standard floss
Be Gentle
Poor flossing technique can lead to complications, so it’s important to be thorough and yet gentle. You can always ask your dentist or hygienist to show you if you are unsure.
Using a WaterPik
“How To” video here: https://www.youtube.com/watch?v=_VThotpGq7g
- Fill the reservoir with warm water & set it on the unit
- Choose a tip and click it into the handle
- Aim the tip at your gum line at a 45 degree angle
- Turn the unit on and close your mouth just enough to prevent water splashes. At the same time, open enough for the water to flow out into the sink. Start with the lowest pressure setting and then place the tip into your mouth while leaning over the sink. Face downward so you don’t get water everywhere.
- When finished, turn it off and press the “eject” button to remove the tip
Bleeding When Flossing
If you’re new to flossing and your gums are inflamed, you may have some bleeding when you initially start flossing. Remember: Healthy gums do NOT bleed when flossed (properly). So buckle down, and rough it out and give it just a little time. It shouldn’t take that long, if you’re consistent. Again, if you’re not sure if you’re doing it correctly, ask your dentist or hygienist to observe and advise you. It’s important enough to work through the initial road bumps of flossing, and get proficient at it!
A few years ago, the New York Times published an article entitled, “Feeling Guilty About Not Flossing? Maybe There’s No Need”
This was an interesting piece of journalism. It seems that the research in favor of flossing is not as solid as one would have hoped. (Possibly because it’s difficult to gauge just who is flossing properly and effectively, vs those who can’t?) It’s disappointing that even the more recent studies involving flossing are not as rigorous as modern science requires.
That being said, we still recommend daily flossing. It is my personal belief that proper use of floss not only prevents periodontal disease (the number one cause of tooth loss in adults), but also helps prevent tooth decay between the teeth. Let’s face it, no matter how well you brush, you can’t get a toothbrush in between your teeth to remove bacterial laden plaque. That we can prove!
Frequently Asked Questions
Do I still need to floss if I brush twice a day?
Yes — even if you brush twice daily, flossing at least once a day is essential because brushing alone cannot reach the plaque between teeth, and that plaque can lead to decay and gum disease.
When is the best time of day to floss?
The ideal time to floss is at night before bed because saliva flow decreases during sleep and plaque is more likely to concentrate and cause damage.
What is the correct way to floss with traditional floss?
Use about an 18-inch length of floss, wrap it around your middle fingers leaving a 1-2 inch segment to work with, guide it between your teeth with a gentle zig-zag motion, curve it into a “C” shape around each tooth down to the gum line and back up, then slide it out — repeating this for each space in your mouth including the backs of the molars.
Can I use a floss pick instead of regular floss?
Yes — a handheld flossing pick can be used; hold the handle firmly, guide the floss tip between your teeth carefully (avoiding snapping), bend the floss around each tooth, slide it under the gum line and along the tooth surface in the same “C”-shape up-and-down motion.
How do I floss if I have braces, fixed bridges or other dental appliances?
If you wear braces or fixed bridges, you should use a floss-threader to get the floss under wires or bridges: thread an 18-inch piece of floss through the loop, pull the pointed end of the threader under the main arch wire or bridge, then floss as you would normally with the “C”-shape and up-and-down motion.
What should I do if my gums bleed when I floss?
If your gums bleed when you begin flossing, that likely means they’re inflamed — healthy gums shouldn’t bleed when flossed properly. Stay consistent with daily flossing and ask your dentist or hygienist to check your technique if the bleeding continues.
Are there any risks of flossing incorrectly?
Yes — incorrect flossing (such as snapping floss between teeth or forcing it under the gum line) can damage the triangular pink gum tissue between teeth, cause recession, or, in the case of dental implants, break the peri-implant seal which lacks nerve endings and won’t warn you of damage.
Is the scientific evidence for daily flossing strong?
While some published articles (e.g., a New York Times piece) have questioned the rigor of flossing studies, the practice remains a recommended daily habit by the Dental Implant Center because brushing cannot reach inter-proximal plaque and that plaque is known to cause tooth decay and gum disease.